Chicken and Matzo Ball Soup

I grew up without a regular religious routine. I know that may seem strange and shocking to many of you, but it seemed like the freedom to explore religion in general to me. As I went to different cultural and religious ceremonies throughout the years, I became curious about the differences…and similarities. I’m not here to debate which religion is the best or most right. I don’t have all the answers. I do, however, have my own opinions based on learning and experience. I will say that all religions have at least one thing about them that strikes me as being true.

That being said, part of learning about culture, heritage, and religion is experiencing the traditional foods. This has always been, of course, my favorite part. You really learn a lot when you examine the food that defines a group of people. The history that is passed down with a recipe is often overlooked in the wake of tradition. However, using what was available to feed those you care about, has always been the basis of family.

2013-03-20-r-dilled-matzo-ball-soup

My Step-Dad’s family is Jewish. I grew up enjoying latkes, kugel, bagels, and matzo ball soup. Eventually I moved to San Francisco. After growing up in a small town, the big city was exciting! So many amazing restaurants to try! Most of my favorite places were, and still are, little hole-in-the-wall dives. Literally. There are so many buildings crammed into that one area that they usually share walls and seem like one big building from block to block. The spaces run lengthwise from the street back and always feel narrow. But, that’s part of the charm. You can find the really authentic food at the small places too. There was a Jewish deli that I would visit as often as I could get to that neighborhood, and I always had to get a knish. Just thinking about them makes my mouth water.

Every once in a while, I would visit the more upscale, and expensive, eateries. Blissfully savoring each morsel, trying to lock each flavor into my memory. Yes, they really were that good. I really learned to appreciate food then. Not just for sustenance, but as the creation of a memory. I think that’s why I love cooking and baking so much. Creating taste sensations that strikes an emotion. OK…now, I’m thinking of the scenes in ‘Ratatouille’ where Remy shows his brother how different flavors mixed together  an create something magical. That’s how it feels when someone loves something you have made. Though, it’s not easy to come up with a truly unique recipe all the time, taking an existing recipe and making it unique is pretty fun! Sometimes, I find shortcuts to make my life easier, without sacrificing quality, or substitutions that take the recipe to a whole new level. Especially healthier options!

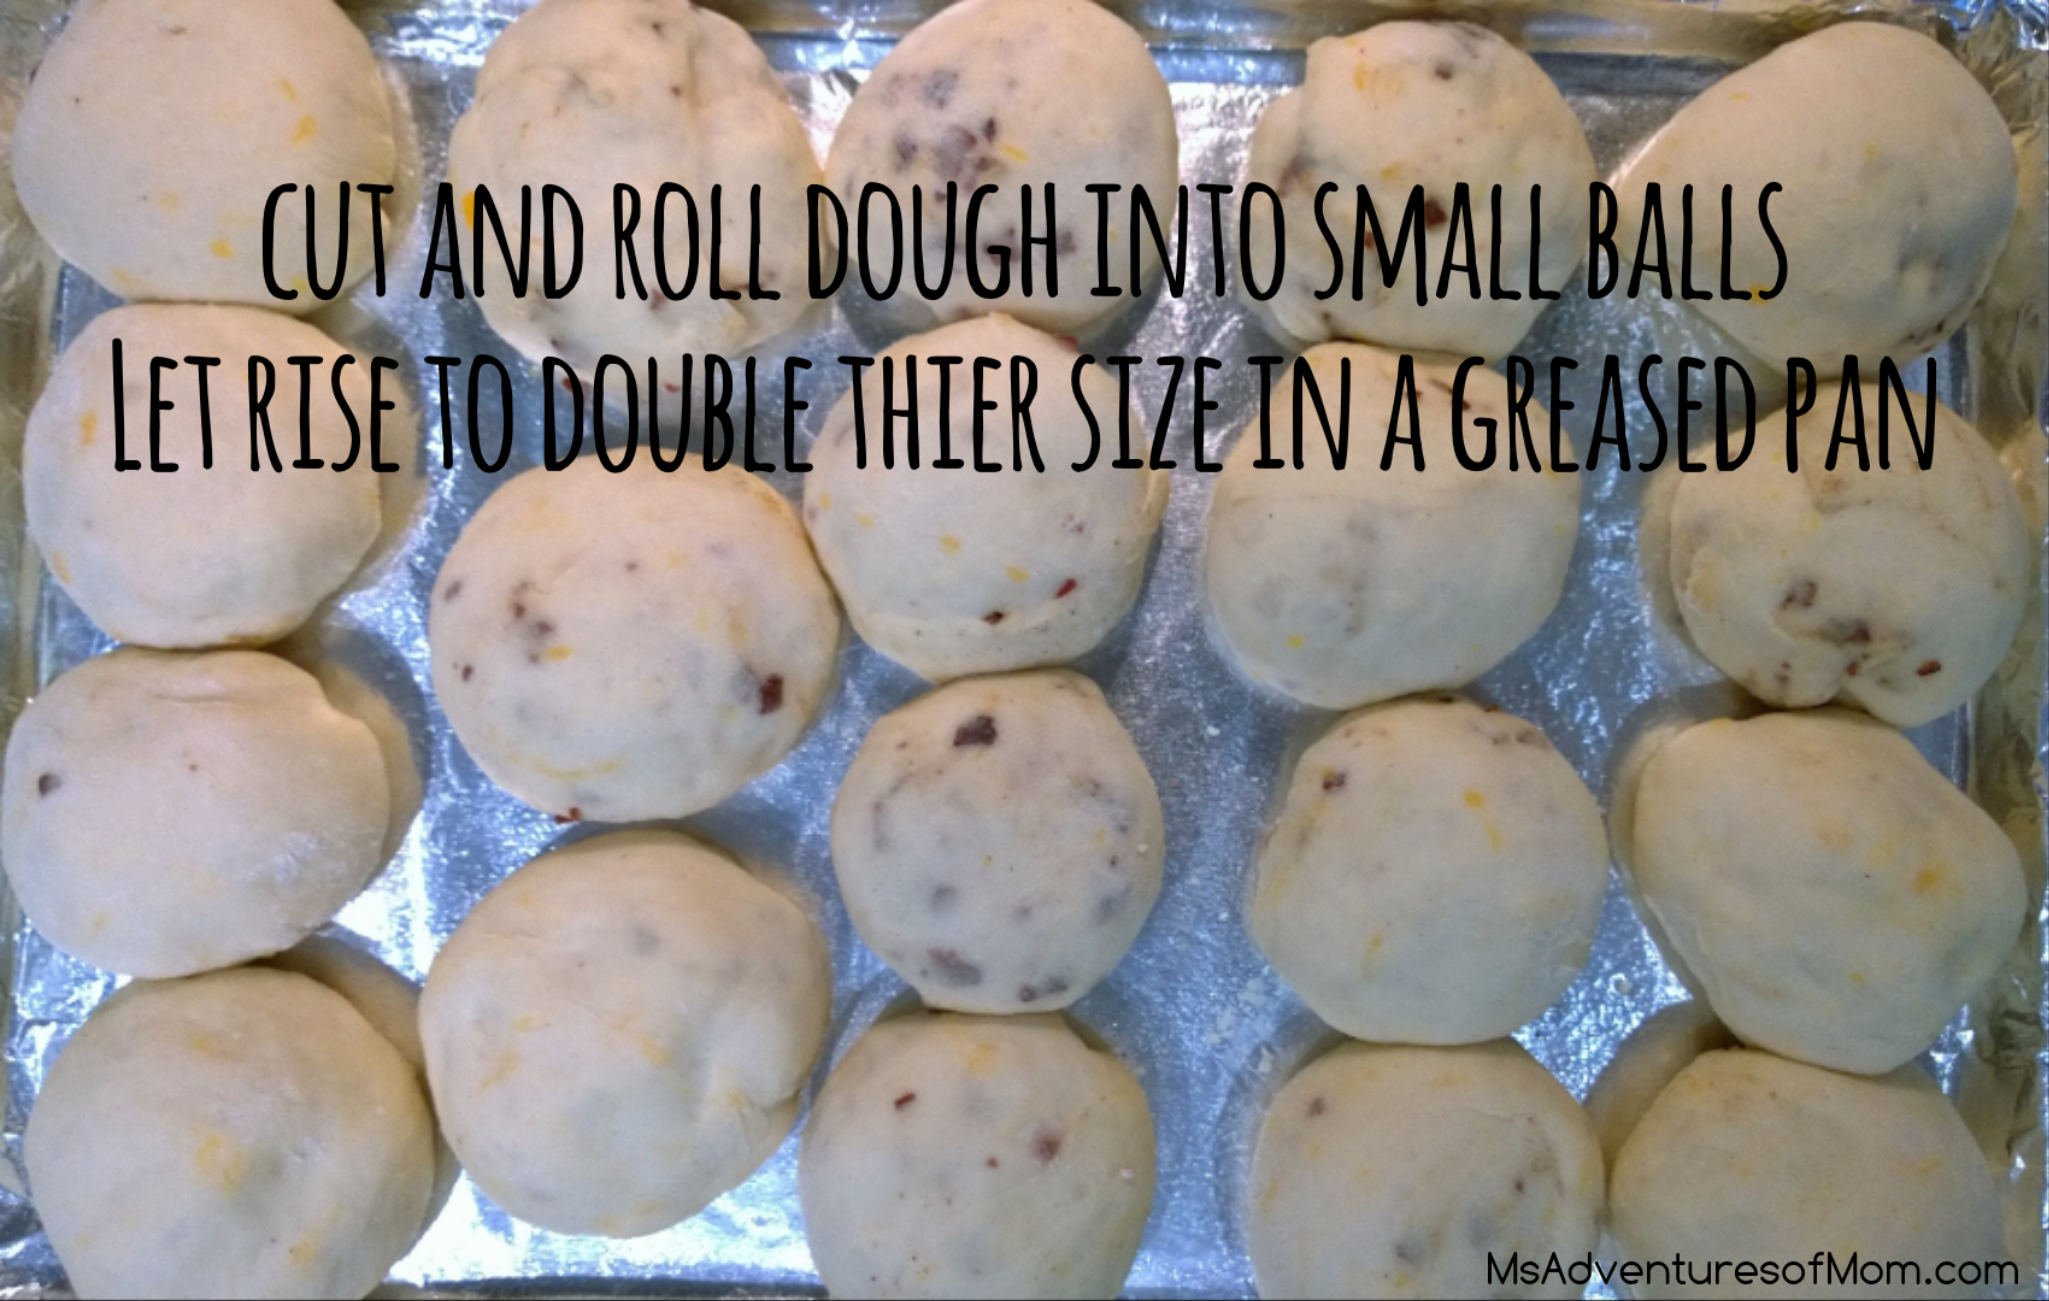
Once I found the kosher aisle in the grocery, I realized that I could easily make chicken soup at home and use the handy-dandy matzo ball mix to make the star of the dish! Life just got easier…and more delicious! Eventually, I had a child of my own, and one time we ended up with a massive cold we kept passing around like a hot potato. In my fevered need to make us chicken soup, I also found that some stores have pre-chopped vegetables. When you are sick yourself, it’s like finding the proverbial pot of gold! If your vegetables are still raw, I suggest sautéing then in a little oil before adding the broth. These days, I use pre-cut frozen veggies (usually my own celery, carrots, onions, and garlic) and those handy cartons of broth. There are also some excellent concentrates, but even a powdered chicken broth will work. It really depends on your preference and budget. Really, you can eat very well on a skimpy income. I also add a chicken breast or two (you actually don’t need a lot) to the broth while it boils. Both the chicken and the51xTaGWr3jL._AC_UL320_SR218,320_ broth will be enhanced by this process. Sounds pretty easy so far right? Frozen veggies, chicken, and broth in a pot and heat to boiling. Let the chicken cook in the liquid the whole time. Seriously. You really can’t overcook it in the liquid, but do make sure the broth covers it completely. I use Manischewitz for the matzo ball mix. Not only because it is a long-time trusted name in the Jewish community, but also because they sell the matzo ball mix without the powdered broth packet. I make my own soup, so I’d rather have double the matzo mix than a packet I won’t be using. Follow the directions on the box for making the matzo balls. The size is, really, up to you. I tend to make mine small; about 1″ around. This allows them to cook easier as they have a bit more room to move around in the liquid. Whatever size you choose, make them as even as possible so that they all finish at the same time. When the soup is finished cooking, I turn the heat off and remove the chicken into a separate bowl. Then, I take two sturdy, metal, serving forks and shred the chicken meat into tiny slivers. Add the meat back into the pot and stir. Voila! Dinner is ready!

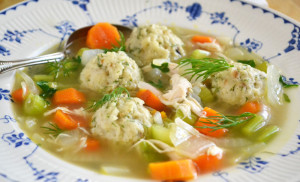
After Thanksgiving (twice,) I knew we would be wanting a lighter meal, and remembered how much we love chicken and matzo ball soup. I always end up making a lot of soup, plus we had leftover pie, so we invited my SIL and her family over for dinner. I have to admit to being a little sneaky here. I just told her that I was making chicken soup. I wasn’t sure how they would react to trying something that sounded so different, and didn’t want the kids to decide ahead of time that they weren’t going to like it. So, I emphasized the pie and didn’t elaborate on the soup. If you have never tried this dish before, they are like dumplings, only lighter and fluffier, as well as seasoned a little more. By the time they got to our house, thanks to a dawdling three-year-old, we were all starving and dug right in! Imagine their faces when even their pickiest eaters loved it! It really is true: you’ll never know what you like, until you try!

The Easiest Spiced Apple Cider

Warm Spiced Apple Cider - One of our favorite fall treats! Great for parties and always enjoyed by trick or treaters (and parents) on cold Halloween nights!

Warm Spiced Apple Cider – One of our favorite fall treats! Great for parties and always enjoyed by trick or treaters (and parents) on cold Halloween nights!

I wanted to share with you the best spiced apple cider recipe ever. It’s so easy you’ll laugh, but tastes like something from a gourmet cooking store (we won’t name any names, but this cider has been compared to the best.) When serving, directly from the slow cooker you make it in, leave the lid off and the heat on low. This keeps it a perfect temp for drinking!

We make this every year for Halloween to give out to those roaming the streets in search of treats. I post a sign on the door letting people know they can ask for a cup, and leave the recycle bin open at the end of the driveway. The delicious smell has been known to affect people standing on the sidewalk! This also makes a wonderful addition to any Fall party. Just be sure to have lots of extra apple juice on hand to keep topping it off throughout the night!

Spiced Apple Cider

Ingredients:

Orange, cut into rounds

Whole cinnamon sticks (1-4)

Whole cloves (4-8)

Apple juice (any kind)

Directions:

Place orange rounds, cinnamon sticks, and cloves (adjust amounts to taste – I usually use two orange rounds, two small cinnamon sticks, and four cloves in a small slow cooker) then add juice up to about an inch from the top. Heat with lid on until hot; a couple of hours. Leave the lid off to serve. When using for a party, leave a ladle and cups next to the slow cooker so everyone can serve themselves.

Breakfast Biscuits with a Healthy Twist

Cheese Bacon BiscuitsBaking from scratch is extremely time consuming, but definitely worth all the effort! Yet, biscuits are one of the easiest breakfast to make. Especially when you have no time in the morning. These cheese and bacon biscuits are light and flaky, even with shreds of sharp cheddar and bacon bits floating throughout each delicate bite. Warm from the oven dripping with butter, they make the perfect accompaniment to eggs. My son also loves to grab them straight from the cupboard for a snack. With all the added preservatives and extras I can never pronounce, I like to make my families’ go-to food as much as possible.

What makes these biscuits healthier? Well, I used turkey bacon and 2% Turkey Baconmilk sharp cheddar cheese in this recipe. Does it make any difference in how the biscuits taste? Really, no. Turkey bacon does have a slightly different flavor, but when it’s cooked up, nice and crispy, and crumbled into tiny bits, we’re talking about total deliciousness! The true test though, is that my pickiest eaters gobble them up.

Cheese & Bacon Biscuits

Ingredients:

9 ounces (1 cup+2 tablespoons) water

2 tablespoons olive oil

1 1/2 teaspoons salt

1 1/2 tablespoons sugar

1/2 cup shredded sharp cheddar cheese (made with 2% milk)

3 cups flour

2 teaspoons dry active yeast

3 tablespoons (turkey) bacon bits

Directions:

*Note: I made my dough in my bread maker. If you have one, I highly recommend using the dough setting to do the hard work of mixing, kneading, and rising. If you don’t have one, here is a wonderful tutorial made by a friend of mine: http://lovefoodies.com/how-to-knead-rise-and-shape-dough.html#.UzgrhNvn9qY

Cut the bacon into small strips (I used scissors to cut the slices directly into the pan.)

Cook while stirring, until crispy and cooked through. Drain on paper towels and set aside.

Crispy BaconAdd each ingredient in order except the bacon. Start the bread maker on the dough setting and set a timer for 35 minutes (into the hour and a half dough timer.) Once the bacon has cooled, break into smaller pieces. At the 35 minute mark, add the bacon bits to the dough.

Once the dough has finished, remove from the bread maker pan onto a floured board. Dough BallsRoll dough into an even shape, cut into small pieces (about 18-20,) and roll each into a ball. Place balls of dough onto a greased pan, cover with a kitchen towel, and let rise 30-40 minutes or until doubled in size.

Preheat oven to 350 and bake for 20-25 minutes or until browned. Don’t worry about the sides (especially if they grew together,) judge by the top color.  Cool on a wire rack. They should last a least a week in a sealed container, but they never last long enough in my house to tell.

Browned Biscuits     Bottom Biscuits

My Experience With Jamberry Nail Wraps

C__Data_Users_DefApps_AppData_INTERNETEXPLORER_Temp_Saved Images_logo

Jamberry. Sounds like something that would be delicious on toast. I had never even heard of nail wraps before a friend invited me to join her online party. Unlike traditional ways of earning extra income, this sales technique is accomplished through social media. Which means that not only don’t you have to leave your house, you don’t even have to wear real clothes! Another big bonus of this trend, is that you can enjoy the benefits of a sales party from anywhere. This particular party was spread throughout a week; which gave everyone ample opportunity to win prizes and look over the vast array of styles available for order.

Let me pause for a minute here to say that I’m the kind of girl who only remembers to cut her nails when they get jagged and catch on things. I also have horribly dry skin and wash my hands about a bazillion times a day. When I say I’m hard on my nails, I mean it! Due to a damaged toenail, and a tendency to go barefoot, I discovered that I am a sucker for nail polish. I love the fun colors. I don’t, however, love anything else about dealing with painting nails. Salons are expensive and stinky. When I do manage to slap some on my toes (no matter how careful I am,) I always mess up a bunch of times until I feel they’re reasonably covered. Then, of course, the general busyness of life steps in to smear, dent, scratch, and chip bits of color away until I shamefully remove the remnants and start the process over.

Enough wraps to cover all your toes.

Pedi Pack – Enough Wraps To Cover Your Toes

Don’t even get me started on my fingernails. In fact, due to food prep, cooking, typing, kids, and dogs, I pretty much never bother with painting my fingernails at all.

Thinking there had to be a better way, I jumped at the chance to learn more. Even though I was introduced to this product through a party, you don’t have to be involved in one to order. You can also attend a party without obligation to buy. In fact, Your Jamberry Consultant will send you a free sample just for asking. I did. Lucky for me, while it was on its way I won a Pedi Pack!

Application Kit With Nail Oil

Application Kit With Nail Oil

Now, down to business. First, I got all the things together that I would need to apply the wraps. The tools I needed to do the actual application were a cuticle pusher (they send you one with the free sample,) tweezers, alcohol pads, cuticle scissors, nail file, and a hair dryer. Clippers, nippers, and cuticle oil are also highly recommended, especially for your nail prep. One of the first things you will notice about Jamberry is that there is an overwhelming amount of information available. The second thing you’ll probably notice is that throughout all the different methods offered, nail prep is stressed as the most important first step. Here is the video I followed for my prep. After gathering all the items I would need to give wraps (or Jams) a try, I watched this video. For more information, here are the official application and tips & tricks videos.

Was it easy? Well, no. At least, not at first. This is a very different process from using polish. I admit I was a little intimidated and watched each of my chosen videos a couple of times before taking the next step. This is a company that seems to understand that everyone is unique, and that there isn’t one method that applies to all people. A concept that appeals to the part of me that believes that the only thing that everyone needs to do, is find what works for them. In any case, your Jamberry Consultant is guaranteed to provide you with answers to all your questions. Yet, all the answers and videos in the world, are nothing compared to practical experience. By the time I had finished one foot, I had realized a few things:

The old builder’s adage of ‘measure twice, cut once’ definitely applies here.

Heat is your friend.

You can turn the sheet over to see a little better when trimming.

If necessary, you can stop and start with no problems.

Want more reasons why so many people are turning to nail wraps?
Pros:
No drying time or noxious fumes.
No need to use nail polish remover.
Sheets of wraps are printed as ordered; so no overstock waste.
You can have intricate designs without any added effort or expense.
You don’t have to purchase a lot of tools or extras in order to use them.
Lasts up to 2 weeks on fingernails and 4-6 weeks on toenails.*
Makes weak nails strong.*
Easy to take off (with cuticle oil and a single use dental flosser) without damaging nails.*
Cons:
There is a learning curve to learning how to apply them to your nails.
There are nearly as many Jamberry related videos as there are wrap patterns, some of them are old and contain info that is outdated.
Some people have had bad experiences with wraps damaging their nail or not adhering properly.
If you make a mistake in trimming the wrap, you could lose out – the reality, though, is that you can still use tiny pieces for other nails, creative overlapping, and having different styles on one or more nails gives you more ways to be creative with your style.

I recently had a chance to ask Jamberry Consultant, Elizabeth King, a few questions:
MAOM: How was Jamberry started?
EK: Jamberry Nails started with three sisters who possess distinct personal tastes, but share a love for style. After an expensive afternoon together at the nail salon, Lyndsey, Christy and Keri vowed to find a simpler, more cost effective way to keep their hands looking polished, while still spending time together. After lots of trial and error, the proprietary nail wraps of Jamberry Nails launched in late 2010. The DIY, at-home application and incredible variety of designs caught on quickly and sales soared. Since then, Jamberry Nail wraps have been featured in In Style, Nail It!, Health, Self, Fitness, Style Watch, Aventura, NYLON, Denver Life, People, Parents, Marie Claire, Nails, Life & Style, Bisous, Style, Today, TotalBeauty, Seventeen, The Blush, Oh So Glam, The Curvy Fashionista, Nails Magazine, WWD, Daily Candy, Chicago Magazine, Tosser, Teen Vogue, Poor Little It Girl, The Marcy Stop, Emily’s Reviews & Giveaways, Chic & Green, and Sprinkles in Springs.
MAOM: How long does it take to receive your order?
EK: It can take from 6-10 business days to get your order, but it is usually way faster!
MAOM: Do the wraps ever become unusable? What is their shelf-life?
EK: As long as the wraps are kept in a cool and dry place, they can last for years.
MAOM: Do you have to be involved in a party to get a free sample or to be able to order?
EK: No! You can ask your Jamberry Consultant for a sample and orders can be initiated any time online.
MAOM: How do you know when your wraps are ready to come off? Will they start to peel?
EK: You shouldn’t leave a set of wraps on for more than 2 weeks on fingers and 6 weeks on toes.  After about 2 weeks they may start to peel, but usually it is the growth that bothers most people. I end up taking them off early, because I want to see a new pattern.
MAOM: Why 2 weeks on fingers, but 6 weeks on toes?
EK: Toenails tend to grow slower, so you can wear them longer.
MAOM: What kinds of problems do people have with the wraps?
EK: Most problems happen due to improper nail prep, or not trimming the wrap enough so that they touch the skin and don’t seal properly. Nail prep is extremely important, but finding the right removal method to prevent damage. NEVER peel your Jams! Always loosen slowly with using some kind of solvent, like oil or acetone, and a tool. If someone has ever had damage to their nails, they should apply the Jamberry Strengthening Base before applying a wrap.
MAOM: What would you say to someone who is interested, but never tried Jamberry?
EK: I loved having my nails done at the salon, but my wallet sure didn’t love the prices with all the high maintenance they required-not to mention the damage it did to my nails. Once I found Jamberry, I never wanted to go back again! Although you can totally wear our wraps over acrylics and gels, If you take the cost of a sheet ($15) and break it down to the cost of one application, you could have a salon quality manicure for $3.75! Can you believe it?

New Jamberry Mini-Heater

New Jamberry Mini-Heater

MAOM: Do you have any more info on Jamberry?
EK: Here is just a quick run-down on all Jamberry has to offer. First, we have our wraps. Over 300 different designs, all made in the USA, vegan, cruelty-free, gluten-free, latex-free, toxin-free, plus the Nail Art Studio where you can create your own custom designs (don’t forget ‘Buy 3, Get 1 Free’!) They also come in kid sizes. Next, we have our gorgeous, toxin-free, latex-free, cruelty-free, gluten-free, vegan, lacquers. They are salon-quality, quick to dry, slow to chip and offer good coverage. We also sell Beauty Boost, a biotin rich multi-vitamin that is designed with optimal nail health in mind. Don’t forget all the necessary application tools in cute little pouches (awesome gift idea!) We sell cuticle oil separately or with the application kits, and have the New Jamberry Mini Heater. Be sure to check out the Indulgence Hand Care set and the Nourish Lotion. Pamper yourself with our amazing hand care set and indulge in softness. We also have gift certificates, which are always the perfect gift! Also, if you’re interested in discounted and free product you can host, or join! Hosting is fun and free and if your friends buy from your party you can earn a lot of free and discounted product. Joining is equally amazing — it’s fun, easy, and you can do as much of your work online as you like, making it an excellent choice for stay-at-home parents, students, and people with other jobs. You get an awesome team supporting you, and you can make the business whatever you need it to be. Want to support a weekly coffee habit? No problem! Want to go bigger and pay your mortgage/rent, buy a new vehicle, or quit your day job? Jamberry can help you do any of those things and I personally know many women who are doing all that and more with Jamberry! Please, contact me with any questions and to get a free sample! Come join the nail revolution!

My First Jamberry Pedicure

My First Jamberry Pedicure


After having lived with my, admittedly, less-than-superior pedicure for a few days, through showers, sleeping, socks and shoes, the conclusion is that they look exactly the same as when I applied them. I can also say that having done it once, I’m anxious to remove them and try again.


*I will have an update in a few weeks with my review of these aspects.